Thursday, 10 January 2013

and Taronga Zoo - Roar and Snore

and we slept with the lions
Taronga Zoo - Roar and Snore

Taronga Zoo

Earlier this year the plus one and I went on a 3 week driving holiday of NSW and the ACT. I wanted to visit Taronga zoo and we did a little research (looked at the website) and we found Roar and Snore. After we arrived back in Sydney from visiting Canberra, the Blue Mountains and the Central coast, we spent our first night at the zoo. We caught the ferry from the city and then a bus to the top of the zoo. It was just after closing and the courtyard out the front was empty. We were the first to arrive. Soon more and more guests arrived with their luggage. The guides let us in around 6.15pm. They placed our luggage on to a cart and escorted us to where we would be staying.

Never smile at a crocodile (for some reason)

Taronga zoo has a permanent camp site. We were in the end tent which contained a double and a single as well as a few camp chairs. All of the tents were powered and had a solid floor. The camp site also has an amenity block and there is a large tent were snacks and breakfast is served. One thing I noticed is that you never went hungry. After we settled into our tents we all met in the dining tent where platters of food were provided. The platters included vegetable sticks, dip, cheeses etc. The guides then brought in some animals to meet us. There were stick insects, lizards and a baby crocodile, as well as other animals. After this we headed to the food hall outside of the camp site were a buffet dinner was served. This was only an hour after the snacks! The buffet was great. There was a massive range of hot foods and salads as well as drinks.

I forgot to take a photo of our tent. 
This is off the Taronga website.

Once we ate all that we could, we met out the front and we were divided into two groups. We then headed of for a night tour of the zoo. It was raining and we were all in poncho's. The zoo was so quiet with only a few rustlings and calls from the animals. We visited the big cats as well as this cute little fox. A lot of the animals were hiding out of the rain but it was still an amazing experience. We then headed back to camp for some ice cream and tea and coffee before parting for bed. To be honest, my sleep wasn't brilliant. The rain on our tent was very loud. I woke up and found my Ipod and put the ear buds in my ears. I was also awaken by the lions roaring early in the morning. I am definitely not complaining about that. It was amazing to be so close to these magnificent animals. I know that I was sleeping somewhere special. Not as amazing as if I was really on Safari in Africa but close enough for me.

Morning Sydney!

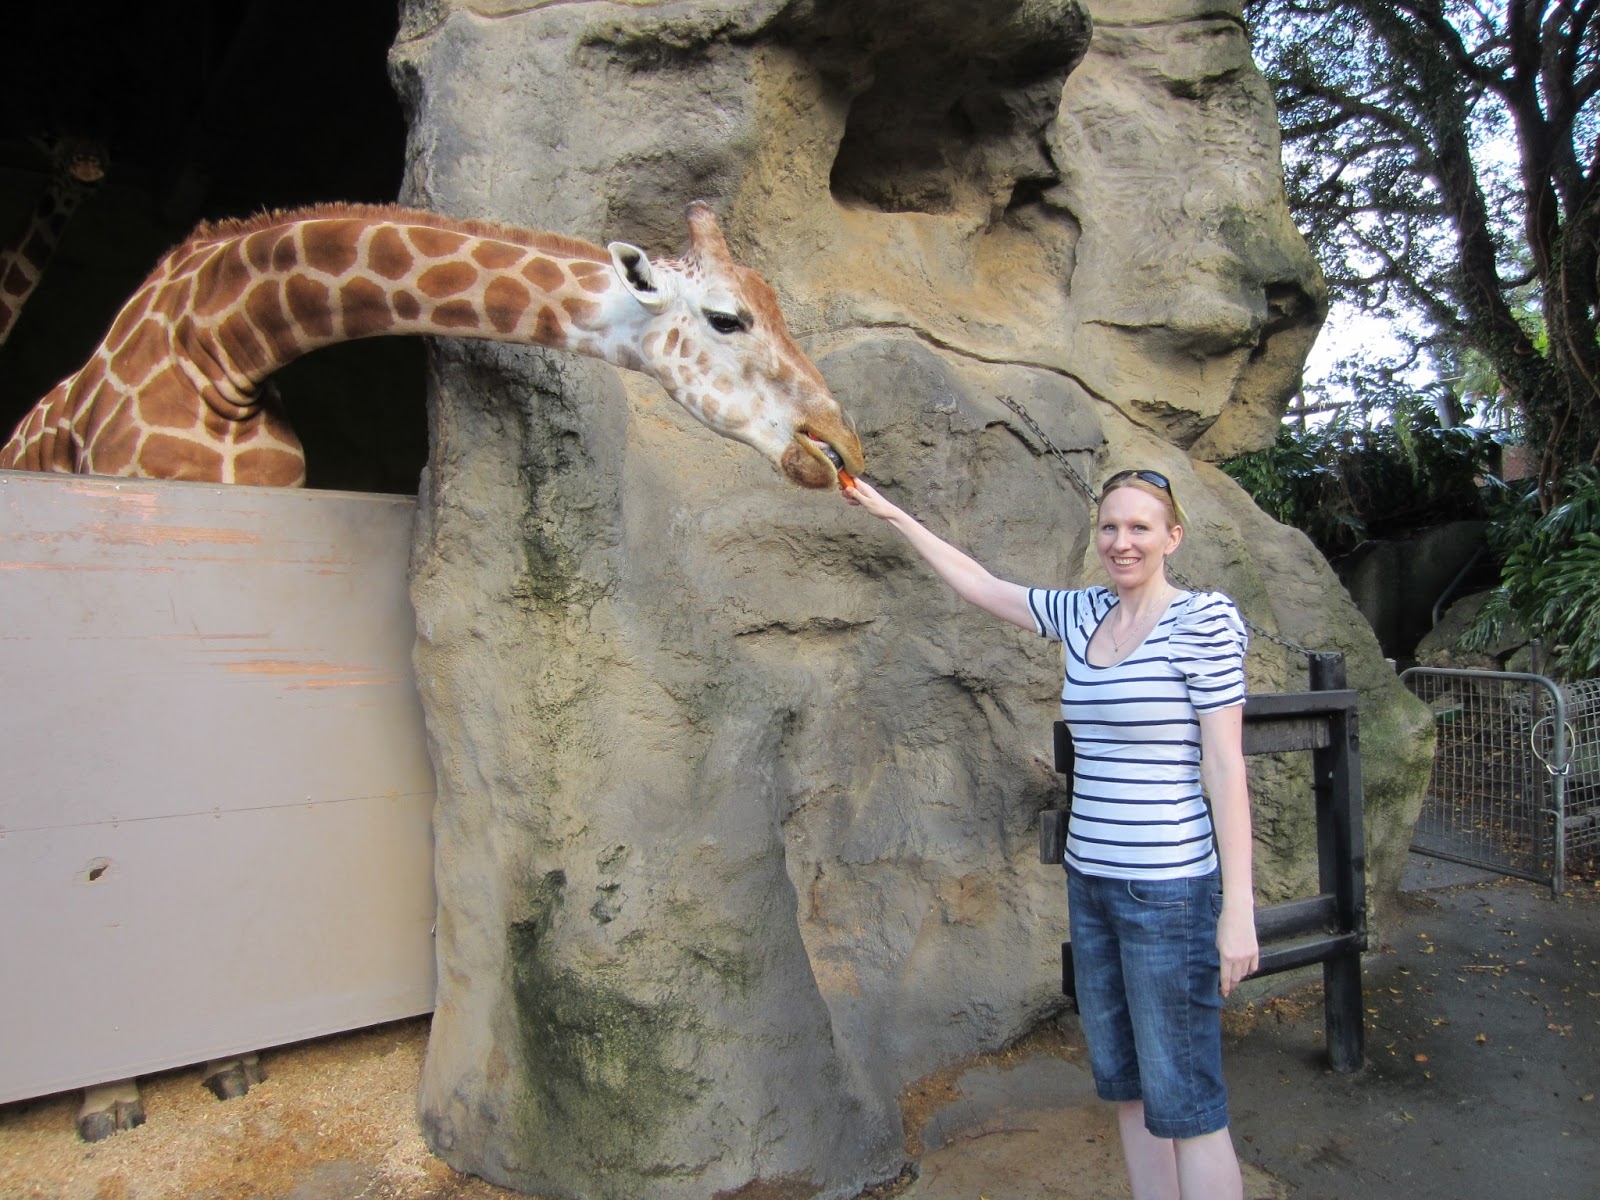
I woke up early and headed to the showers. The amenities block has lots a bathrooms and are really new and clean. I then headed back to my tent and grabbed my camera took photo's one of the best views of Sydney. I went out onto the deck and took some beautiful shots of the harbour. We then enjoyed a continental breakfast. Afterwards we headed back to our tents to pack up and prepare for the next activities. We walked though the quiet zoo and went behind the scenes of the nocturnal house and met one of the keepers. He spoke to us about the dangers native animals face because of feral animals and human activities. We met a tiny native mouse. Don't worry. They look a lot cuter than the rodents most people are use to. They have big eyes and big ears. They are also nocturnal and do not go into houses. He was so adorable. He kept running up the arm of the keeper and onto his shoulder or head. After this we headed to the giraffe enclosure where we met another keeper. After a talk from the keeper about the animals we lined up and fed the giraffes carrots. They are hilarious with their long necks and huge tongues, licking the carrots out of your hands.

Me feeding a giraffe

From here we headed to the education center to meet even more animals. We patted an echidna, a koala and a quokka. All native Australian animals. So I highly recommend this to international travelers. There were heaps of photo opportunities. This was then end of the Roar and Snore aspect of the day. They held our luggage in the education center and we all headed our separate ways to explore the zoo. It was an amazing time. The weather was much better then the day before. There was just a few sprinkles of rain. It was still early in the morning and the gates hadn't quiet opened yet. The zoo wasn't that quiet though. All of the animals were very active. We even saw the elusive Snow Leopard. Although we failed to get a good photo of him. We spent half the day wandering around enjoying a really amazing zoo.

Native rat I think.... 

Quokka

Snow Leopard

Seal

Elephants (my favourite animal)

Lion

Himalayan Tahr


Francois' Leaf-monkey

I highly recommend the experience to everyone. Especially the animal lovers out there. All of the keepers, including our guides for the stay, were so friendly and informative. Taronga Zoo has a sister zoo, Taronga Western Plains Zoo. It is located in Dubbo, a 5 hour drive north west of Sydney. But don't worry. There are flights there. The Western Plains Zoo has it's own Roar and Snore as well as Zoofari lodges. My plus one went with his family when he was younger and stayed the night at the zoo.

Both of us agreed that it was the best part of our holidays. We were so lucky to be able to experience such a fantastic night. Hopefully it won't be a once in a life time experience!

Love, love Elle.


Saturday, 5 January 2013

and Penguin Island, Rockingham

and a ferry to visit the little ones
Penguin Island, Rockingham


View from the jetty towards Penguin Island

Today some of my family and I headed to Penguin Island, just off the coast of Rockingham. Penguin Island is connected to the mainland via a sand bar. Last time I went to the Island I walked across but this time I took the ferry. It means you stay a lot dryer and you don't smell so much. There is a lot of seaweed about. We then jumped straight onto the Penguin and Sea Lion Cruise. The cruise was nice and fun. It took us past some little islands around Penguin Island and over to this one island which had around 6 or 7 seals resting on the beach. Apparently only the males ever use that island to rest.

Small rock islands

Sleeping seals

They woke up for a yawn then went back to sleep

Me on the back of the boat.

We then headed back to the jetty and we were just in time for the Little Penguin feeding in the Discovery Center. The penguins were so adorable. Some were constantly swimming around. Others didn't want to leave the rocks and one or two didn't want to leave the resting area. This one penguin, Nemo, was a huge show off. He kept swimming around on his side splashing about.

Little Penguins

He is waiting for his lunch 

'Nemo'

They look so cute swimming around

Hiding molting penguin. They can't swim until they have finished.


After the feeding was over we headed onto the lawn for a picnic lunch. I took the second herb roll I baked and made sandwiches under a tree. There are these large lizards which were scuttling around though the groups of picnickers trying to find food to steal. They were kind of cute but I didn't want them running over my lunch.

Lizard trying to steal food

There are a few look outs on the island and there is a nice walk around the island. We had a quick wander but we didn't go all of the way around.


View from Penguin Island to the locations of the seals.

It was a lovely day out and I can't believe that there is only one day left of the holidays. Where has the 2 weeks gone? Penguin Island is a great little location and I am glad I returned. Last time I didn't see the penguin feeding or go on any cruise. They were both awesome to do and see.

Until next time.
Love, love Elle.

Friday, 4 January 2013

and Crusty Italian Herb Bread

and the house smells amazing!
Crusty Italian Herb Bread

Today my plus one and I made some amazing smelling and tasting bread. I decided that I wanted to make the bread from scratch and completely my hand. No Kitchenaid or bread maker was used in the process. It was great fun kneading the dough and as the time went on we become hungrier and hungrier as we could smell the bread, first rising, and then baking.

Recipe from Allrecipes.

Preparation time: 1 hour 40 minutes
Cooking time: 35 minutes plus 15 minutes cooling (we couldn't wait this long)
Serves: 24

Ingredients:
  • 2 (8g) packets yeast (I only had 7g packs and but managed to get 16g out of them, somehow...)
  • 2 cups (500ml) warm water (45 C)
  • 1 1/2 tablespoons caster sugar
  • 3 tablespoons olive oil
  • 3 teaspoons salt
  • 1 tablespoon dried basil
  • 1 tablespoon dried oregano
  • 1 clove garlic, crushed
  • 1/2 cup (60g) grated Pecorino Romano cheese
  • 6 cups (875g) bread flour

Method:
  1. Mix yeast, warm water and sugar together in a large bowl. Set aside for five minutes, or until mixture becomes foamy.
  2. Stir olive oil, salt, herbs, garlic, cheese and about half of the flour into the yeast mixture. Gradually mix in the remaining flour. Dough will be stiff.
  3. Knead dough for 5 to 10 minutes, or until it is smooth and rubbery. Place in an oiled bowl, and turn to cover the surface of the dough with oil. Cover with a damp cloth. Allow to rise for 1 hour, or until the dough has doubled in size.
  4. Punch dough down to release all the air. Shape into two loaves. Place loaves on a greased baking tray. Allow to rise until doubled in size, about another 30 minutes.
  5. Bake at 180 degrees C for 35 minutes. Remove loaves from the tray, and let cool on wire racks for at least 15 minutes before slicing.


Dough in a large bowl ready

Just out of the oven

Made into bruschetta

The bread is great eaten warm with butter but we liked it best toasted. It was prefect for bruschetta as it was already a bit garlicky. The garlic and herbs were quite subtle in the bread but I thought it was about right. It was not overpowering.

The recipe made two great sized loaves. The one still whole in the pictures was shaped by me and the wider one that we made into bruschetta was shaped by the plus one. This was our first every yeast bread. I have made Irish soda bread before and I have learnt not to be afraid of cutting nice deep slits into the top. I thought I had cut to deep but it turned out about right, while the plus one cut shallower slits which almost disappeared during the baking process.

Next on the bread baking list is Sourdough. I currently have the starter ripening? souring? in the spare room. So in a few days I will be baking another lot of bread. I would love to only eat home made bread but I think that's currently a little ambitious.

Love, love Elle.

Monday, 31 December 2012

and looking back at 2012

2012 in review.

2012 has been good to me. I went on a few holidays, welcomed my second nephew into the world and passed the four year mark with my plus one. I also started blogging. Something I never really thought of doing before. Another big thing for me is starting my 30 before 30 quest. Which I am loving because it has allowed me to focus on some goals for the near future. Some are small and some are huge. I have only completed two. One being reading Pride and Prejudice. Which I loved and now have the complete set of Jane Austin (a Christmas present from the plus one). The second one was climbing Bluff Knoll. I hope to complete many more of these during the upcoming year. One in particular is the riding 100km in one day. So far I have reached 60km and we are planning to ride some more, increasing the distance everytime, and try the 100km when the weather is cooler, probably around March.

Meeting my new nephew for the first time.

Currently I am sitting at the computer looking through photos from a holiday I went on with my plus one, earlier in the year, to Sydney and Canberra. I am picking out the best to print out to go into a photo album. From that I will choose some of the best to go into a scrap book of my 20's as a part of another 30 before 30 goal. I had never been to Sydney before, although I ventured into New South Wales, to Deniliquin, in 2010 as a part of another holiday which included Adelaide, Victoria and Tasmania. We spent around 3 weeks driving in a big loop from Sydney, down to Woollongong, out to Canberra. We then traveled north to Cowra then to the beautiful Jenolan Caves where we stayed at the caves house. We then spent a couple of nights in the Blue Mountains in a holiday home at Blackheath. From here we traveled to the Central Coast then back to Sydney. Our first night back in Sydney we stayed at Taronga Zoo. This was my favourite experience on our holiday. Taronga Zoo has an over night stay called Roar and Snore. I will go into this more at another time. It deserves it's own post.

We wanted to go hang gliding when we were south of Sydney but for the the two days that we were in the area there wasn't enough wind to support us. Which we were told was very rare. So I popped hang gliding on the list.

Glebe in Sydney.

Jenolan Caves House NSW

Me in the Blue Mountains

Sydney from Fort Denison 

The other big holiday I went on this year was to Bali. It was my first time there and only my second time out of Australia. The holiday was for a friends wedding and although the holiday wasn't very long it was still very enjoyable.
Bali temple at a resort

Spa room in the resort

Me dressed up for the wedding

Relaxing on my last night in Bali

Starting tomorrow I will be commencing Project 365. 1 photo, everyday, for 365 days. I am really looking forward to this. It is also on my list of things to do before I turn 30. My weekday routine doesn't change much during the year so I will have to try to find different subject matter. I have a few friends also doing Project 365 including a friend who is doing her own 30 before 30.

Other things I am looking forward to next year include going to visit my best friend in Brisbane. She is about to move there and I hopefully will be able to go in the upcoming months. I have never been to Queensland before so it will be an exciting holiday.

My new years resolution will be to save more. I have a lot of expensive things planned for the upcoming years, so saving in the midst of this will be hard. But hopefully I will learn how to be more frugal and less impulsive with my money. Being impulsive with my cash is something I suffer greatly from.

Well I will see everyone in the new year. I hope everyone has a fantastic New Years and I ope the upcoming year brings many joys.

Love, love Elle.

Friday, 28 December 2012

and White Chocolate and Strawberry Cheesecake

and a day for boxing
Boxing Day Cheesecake

Well Christmas is all over. I still have the tree up and there is one lonely present under it still to be given. I am not sure of the custom. Am I supposed to take it down before New Years? It will defiantly come down sometimes this holidays.

The last Christmas event this holidays was on Boxing Day lunch at my plus one's parents house. Christmas is often very hot her in Perth. So a cold lunch is often preferred over a hot dinner. It was around 40C (104F) on Christmas day and a refreshing 37C (98F) on boxing day. I offered to bake the cheesecake for dessert and it turned out better then I had thought. I started it Christmas night when I was exhausted and my mind was struggling to work out even the simplest of equations. I struggled to work out how many cups of sour cream it needed. It should have been simple because the recipe told me. But it wasn't.

White Chocolate and Strawberry Cheesecake


Adapted from Better Homes and Gardens Christmas Cookbook 2012

Preparation time: 20 minutes plus 1 1/2 hours cooling and overnight chilling.
Cooking time: 1 3/4 hours (the oven is off for an hour of this)
Serves: 12

Ingredients for baked cheesecake

  • Cooking oil spray, for greasing
  • 450g cream cheese, at room temperature
  • 200g caster sugar
  • 3 tsp cornflour
  • 3 eggs
  • 2 Tbsp lemon juice, strained
  • 1 1/2 tsp vanilla extract/paste
  • 1/4 tsp salt
  • 3 cups sour cream
  • 1/3 cup strawberry jam
Ingredients for topping
  • 250g cream cheese, chopped, at room temperature
  • 170g white chocolate, melted, cooled
  • 120g unsalted butter, softened
  • 3 tsp lemon juice
  • cherries
  • 200g white chocolate extra
Method
  1. Preheat oven to 180C fan forced. Grease a 20cm spring form tin with cooking spray and line the base and sides with baking paper so it extends 3cm above the sides. Wrap base and sides of tin with alfoil to make it waterproof.
  2. Put cream cheese in a bowl of an electric mixer and beat on low until almost smooth. Add sugar and increase the speed to medium-high and beat for 3 minutes or until smooth. Beat in cornflour. Add eggs, 1 at a time, beating well after each addition, scraping sides of bowl. Beat in juice, vanilla, salt and sour cream until just combined.
  3. Pour 1/3 of the cream cheese mixture into the prepared tin. Top with 1/2 of the jam. Repeat layers, finishing with the cream cheese mixture. Run a skewer through the layers to swirl jam.
  4. Put tin in a deep roasting pan. Pour enough hot water into pan to come up 2-3cm up the side of the tin. Bake for 45 minutes. Turn off the oven and leave the cheese cake in the oven, with the door ajar, to cool for an hour. This will help prevent cracking on the top of the cake. Put tin on a wire rack to cool completely. Remove paper and foil (remove from tin if required then return to tin). Cover with plastic wrap and refrigerate, in tin, over night.
  5. To make topping, put cream cheese in a bowl of an electric mixer and beat until smooth and creamy. Gradually beat in chocolate until smooth, then beat in butter and juice.
  6. Put cake on a serving plate. Spread all over with topping and refrigerate until firm.
  7. Melt extra white chocolate in a heat proof bowl, in a microwave or on a stove a top a sauce pan with enough water to sit below the bowl. When melted remove from heat and dip cherries in, allowing excess chocolate to drip off. Place on a baking paper lined cooking tray. Refrigerate.
  8. Remove cake and cherries from refrigerator and decorate cake with cherries.


I had left over white chocolate from dipping the cherries so I poured it over a granite slab and placed it into the refrigerator to set. I then made little curls with a melon baller and covered the cake with them. It looked a little like snow and added to the Christmas feeling. If you don't add the 'snow' a good tip for making the cake look neat is to smooth the topping after it comes out of the refrigerator before you add the cherries. Not a fan of cherries? or are they in short supply? Any chocolate dipped fruit will do. Try strawberries to match the jam. Or change the jam to match the fruit! I am all for changing a cake to suit your own tastes.

The cake was ridiculously creamy and I am pretty sure everyone had at least seconds. It was sweet and refreshing on a hot Boxing day. This is definitely going on my 'to bake again' list.

Until next time.
Love, love Elle.


Wednesday, 26 December 2012

and Victoria Sponge Cakes

and cakes for Christening
Victoria Sponge Cakes


Adapted from BBCgoodfood

 Last Sunday I went to my first ever Christening. My cousins little boy was Christened in the morning and afterwards we went back to my nanna's house for our Christmas lunch/Christening lunch. My cousin asked me to bake two cakes for him. A vanilla sponge cake and a chocolate one. Earlier in the year I baked her wedding cake, so I decided to use the same sponge recipe again and find a chocolate version. But things weren't going to plan so I change both the recipes to a Victoria sponge recipe instead.

Vanilla Sponge


For the sponge

  • 200g caster sugar
  • 200g softened butter
  • 4 eggs, beaten
  • 200g self-raising flour
  • 1 tsp baking powder
  • 2 tbsp milk
For the filling
  • 100g butter , softened
  • 140g icing sugar , sifted
  • drop vanilla extract/paste
  • strawberry jam
  • fresh strawberries
  • icing sugar , to decorate
Method
  1. Heat oven to 190C/fan 170C/gas 5. Spray 2 20cm cake tins with cooking oil spray and line with non-stick baking paper. 
  2. In a large bowl, beat all the cake ingredients together until you have a smooth, soft batter.
  3. Divide the mixture between the tins, smooth the surface with a spatula or the back of a spoon, then bake for about 20 mins until golden and the cake springs back when pressed. 
  4. Turn onto a cooling rack and leave to cool completely.
  5. To make the filling, beat the butter until smooth and creamy, then gradually beat in icing sugar. 
  6. Beat in vanilla extract/paste. 
  7. Spread the jam on the top of the bottom cake layer and the bottom of the top cake layer. 
  8. Spread the butter cream over the jam of the bottom cake layer and arrange the fresh cut strawberries on top and sandwich the second sponge on top. 
  9. Dust with a little icing sugar before serving. 
Keep in an airtight container and eat within 2 days.


Chocolate Sponge

For the sponge

  • 200g caster sugar
  • 200g softened butter
  • 4 eggs, beaten
  • 200g self-raising flour
  • 1 tsp baking powder
  • 2 tbsp + 1 tsp milk
  • 1 1/2 tbsp cocoa
For the filling
  • 100g butter , softened
  • 140g icing sugar , sifted
  • 3-4 tbsp chocolate sauce + extra
  • strawberry jam
  • fresh strawberries
  • icing sugar , to decorate
Method
  1. Heat oven to 190C/fan 170C/gas 5. Spray 2 20cm cake tins with cooking oil spray and line with non-stick baking paper. 
  2. In a large bowl, beat all the cake ingredients together until you have a smooth, soft batter.
  3. Divide the mixture between the tins, smooth the surface with a spatula or the back of a spoon, then bake for about 20 mins until golden and the cake springs back when pressed. 
  4. Turn onto a cooling rack and leave to cool completely.
  5. To make the filling, beat the butter until smooth and creamy, then gradually beat in icing sugar. 
  6. Beat in 3-4 tbsp of chocolate sauce (to taste). 
  7. Spread the jam on the top of the bottom cake layer and the extra chocolate sauce on the bottom of the top cake layer. 
  8. Spread the butter cream over the jam of the bottom cake layer and arrange the fresh cut strawberries on top and sandwich the second sponge on top. 
  9. Dust with a little icing sugar before serving. 
Keep in an airtight container and eat within 2 days.

I cut out the enitials of his name and dusted the icing sugar around them.

Both cakes turned out great and the butter cream was not over powering or too sweet. I am definitely becoming a fan of vanilla paste over vanilla extract and that's what I used in this recipe. I love seeing the little seeds in the mixture. For the chocolate sauce I went to the ice cream topping section of the super market. I added the chocolate sauce to the cream bit by bit and tasted it as I went. Depending on how strong your sauce is and how chocolaty you want the cream add more if desired. My cousin wanted fresh strawberries not jam in the center so I altered the recipes to suit. I used a little jam to give an extra flavour kick.

Until next time.
Love, love Elle.

Friday, 21 December 2012

and a tree of glass

Christmas Tree

I have had my tree up for a while, but I am only now getting a chance to blog about it. Last year was the first year that I put up my own Christmas Tree. I would have loved to have one before this but some of my previous housemates had cats, and I was too afraid that they would destroy my tree. It wouldn't have been too much of an issue if I used plastic decorations but I wanted glass, so I waited until the house was cat free. I chose a smaller tree because I have a small house and I have it placed on my dining table. This shows that I don't use my dining table for what it is intended for very often.

Christmas tree


Little dove inside the bauble


Royal Doulton Heart

Lights on

Presents under the tree

As you can see it is pretty hard to photograph glass objects. I don't know my way around my DSLR enough to work with focus. I also haven't found a tree topper I like yet. I'd like to find something simple and modern. A lot of what I have come across is covered in glitter, which just isn't me. I'd love to have two trees, or even two sets of decorations for the one tree. Then I could have either a modern tree with lots of metal and glass, and a handmade tree with a Scandinavian feel.

Maybe one day.

I hope everyone else's tree is trim and pretty.

Until next time.
Love, love Elle.


Related Posts Plugin for WordPress, Blogger...